Click on Event Management under My Instructor Tools.
After clicking on Event Management, a list of all previously entered events will be visible. You may sort by event date, course, or instructor. (We will re-visit functions in this area later in this tutorial,click hereto skip ahead.)
To add a new event, click on Add Event.
Select the Sponsoring Agency for which you are instructing.
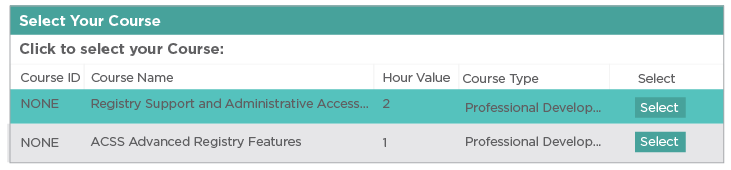
You must now search for the course that was created by the Sponsoring Agency. Type in a word or two from the course title, and click on Search.
After searching for the course that the Sponsoring Agency has created, select the course that is needed.
After Select is chosen, all course details will be imported into the Event creation window.
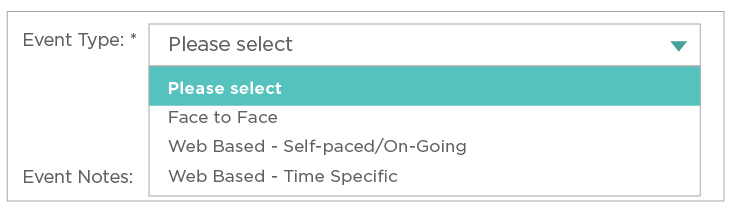
Select the Event Type.
After choosing Event Type, fill out the details of the event, such as Time, Location, or URL.
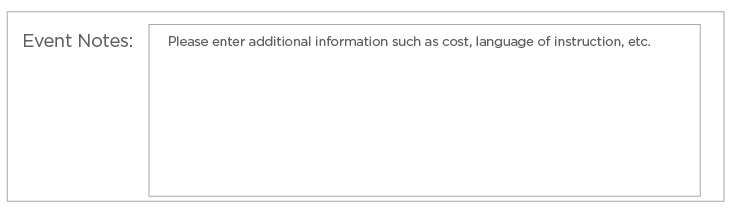
Fill in any special notes you have pertaining to the event. You have 1500 characters to add any information you feel necessary. This text box will take HTML, if you utilize HTML Code.
Publish Event if you wish the event to immediately show in the Registry’s Find Training Events. If you don’t publish now, you can publish at a later time.
Fill in the field for Event Capacity.
If there is a charge for the event, fill in the field for Price Per Person. Please note that the Registry does not have a function for collecting the fees associated with an event. You may need to use the Event Notes field to specifically state how costs will be collected.
If you have a Business PayPal Account, you can add in your PayPal Button Code.
Select a Funding Source.
If the event is a conference, input the Conference Name.
You may select the First Things First Regional Council areas where your event will be held.
Click Submit.
Editing Created Events and Roster Management
Click on Event Management under My Instructor Tools.
After clicking on Event Management, a list of all previously entered events will be visible. You may sort by Event Date, Course, or Instructor.
Your event page will show the following categories:
Your Event will be listed with the following view.
Under Published, you will see a Yes or a No. If you wish to change the designation, simply click on the word. It will change for you.
Under View, there is an Icon of a File. If you click on the File Icon, you will see all the details of your event. You can return to your event by clicking on Return to Event Manager.
In the Delete column, you will see a small red X. If there are not any users on the roster, you can delete the event.
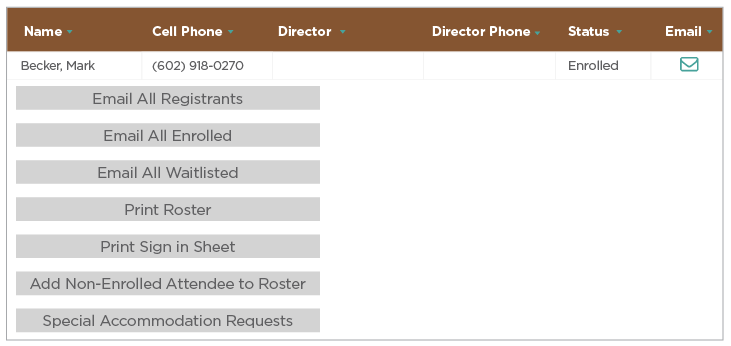
In the Roster Column, you will see an icon of a small green person.
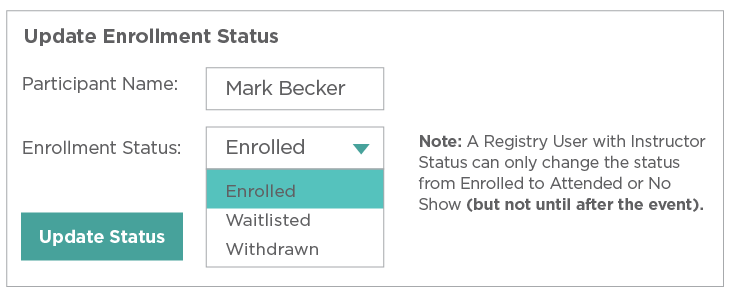
Click on the Roster Icon. On this screen, you can change status of an enrolled user from Enrolled to Attended or No Show (but not until the day of the event), Email Registrants, Print Roster, Print a Sign In Sheet, Add Non-Enrolled Attendee to Roster and view any Special Accommodation Requests.
To change Status of an enrollee, simply click on the Status.
Change Status and click on Update Status. (Attended and No Show will not be an option until the day of the event.)
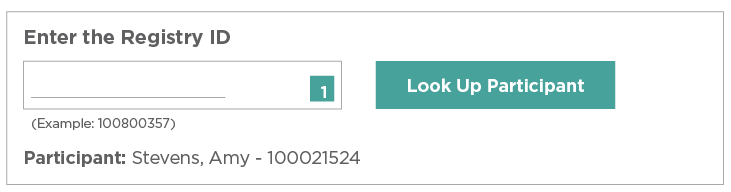
If you need to manually add a Registry User to the Roster, you can do this if you know their 9 digit Registry ID. Click on Add Non-Enrolled Attendee to Roster.
Add in the 9 digit Registry ID, and click on Look Up Participant.
If the correct Participant is returned, click on Add to Roster. If prior to the event, the user will be added to the roster with the status of Enrolled. If after the event, the user will be added to the roster with the status of Attended.
You now understand how to add an event and use the roster management function.
The average wait time for processing your college transcripts is 30 Days. For questions regarding your Registry account, please contact info@thearizonaregistry.org.